Howto train a CNN with TensorFlow on FloydHub
Nowadays artificial intelligence (AI) is a big thing. Computational power increased a lot within the last years which makes it possible to build and run large Neural Networks (NN) for Deep Learning (DL) that model various problems extremely well. Unfortunately huge networks consume large amounts of memory and computational power. Often developers do not have the necessary hardware available to solve larger problems in a suitable time. One solution to this problem is to shift the heavy computational task to the some cloud provider.
This article demonstrates how to solve the MNIST Digit Recognizer task by using a Convolutional Neural Net (CNN). It will be trained with TensorFlow, Google's open-source software library for Machine Intelligence. For the heavy-lifting the cloud provider FloydHub will be used.
This article uses the Kaggle Dataset for MNIST Digit Recognizer.
# Table of content
- Why FloydHub
Quick overview of what FloydHub is and why I've chosen this provider. - CNN Architecture
Anwers how the CNN architecture does look like in more detail. - Get the code
Explains how to get the code to run get your own instance up and running. - Upload data to FloydHub
Explains how data can be transferred to FloydHub by using their CLI tool. - Run a Jupyter notebook
A Jupyter notebook will be started on FloydHub. - Train the CNN
Explains how the CNN can be trained in the cloud.
# Why FloydHub?
The aim of Floydhub is to be the "Heroku for Deep Learning". Given how easy it is to use Heroku for deploying websites, it seems a perfect candidate to focus on the things we really want to do - not to much on how to handle the infrastructure.
Obviously another reason is that if we need huge amounts of GPU power, FloydHub has us covered. They offer access to one Nvidia Tesla K80 graphic card with 12GB RAM per instance. And this GPU is a beast! It gives us the option to run even very deep and memory intensive networks. Also this provider offers a per second billing and auto-termination of jobs after they run. I think this setup is quite good and something I wanted definitively to explore.
This article assumes that you have created an account at FloydHub and installed their CLI tool. If you haven't please do so first and get 100 hours free GPU, which is more than enough to follow this article.
# CNN Architecture
Let's first talk about how our CNN will look like. We'll use a CNN with four convolution (CONV), two max-pooling (POOL) and two dense (or fully connected, FC) layers. The basic structure looks like this:
| LAYER TYPE | F | S | PAD | FILTERS | X | Y | Z | MEM (COUNT) | MEM (SIZE IN KB) | WEIGHTS (COUNT) | USAGE OF WEIGHTS IN THIS LAYER | |
|---|---|---|---|---|---|---|---|---|---|---|---|---|
| INPUT | 28 | 28 | 1 | 784 | 0.7656 | 0 | 0.0000 | |||||
| CONV | 3 | 1 | 1 | 64 | 28 | 28 | 64 | 50176 | 49.0000 | 576 | 0.0001 | |
| CONV | 3 | 1 | 1 | 64 | 28 | 28 | 64 | 50176 | 49.0000 | 36864 | 0.0055 | |
| POOL | 2 | 2 | 14 | 14 | 64 | 12544 | 12.2500 | 0 | 0.0000 | |||
| CONV | 3 | 1 | 1 | 128 | 14 | 14 | 128 | 25088 | 24.5000 | 73728 | 0.0110 | |
| CONV | 3 | 1 | 1 | 128 | 14 | 14 | 128 | 25088 | 24.5000 | 147456 | 0.0220 | |
| POOL | 2 | 2 | 7 | 7 | 128 | 6272 | 6.1250 | 0 | 0.0000 | |||
| FC | 1 | 1 | 1024 | 1024 | 1.0000 | 6422528 | 0.9598 | |||||
| DROPOUT | ||||||||||||
| FC | 1 | 1 | 10 | 10 | 0.0098 | 10240 | 0.0015 | |||||
| SOFTMAX |
In total this CNN has around 6.7 million weights. As it's quite common in CNNs nearby all parameters (ca. 96%) are located towards the end of the network in the first FC layer. Note that after the first FC layer a dropout layer is used for regularization of weights. After the last FC layer a softmax function is used to squash values between 0 and 1 which allows to treat them as predictions.
The following meta parameters are used to train the CNN:
learning_rate = 0.001       # learning rate of the network
training_iters = 100000     # number of total iterations used for training
batch_size = 56             # number of samples in each training step
keep_prob = 0.75            # probability to keep nodes in DROPOUT layer
Alright, let's have some fun with this network and FloydHub.
# Get the code
To get the code please checkout this git repository. It comes with a dockerized environment which installs all necessary requirements, such as NumPy, SciPy, Jupyter and tensorflow. To get started make sure to have docker installed.
If you don't want to use the dockerized setup, feel free to use the notebooks directly from the notebooks directory.
But be aware that in this case you have to adjust the INPUT_ROOT and OUTPUT_ROOT paths in the floydhub-simple-cnn.ipynb file.
You then also have to install all requirements on your own.
git clone https://github.com/dotcs/mnist-cnn-floydhub  # clone git repository to local machine
cd mnist-cnn-floydhub      # change into the cloned directory
sh extract-zip-locally.sh  # extract zipped training and test data to ./input folder
docker-compose up          # start the dockerized environment
Now a local instance of Jupyter should run on localhost:8888.
You can use that to discover how the CNN is written using TensorFlow. The corresponding notebook is called floydhub-simple-cnn.ipynb and will be listed in Jupyter.
But beware, training could take forever depending on your machine.
This is exactly why we need to do computation in the cloud.
Let's go ahead!
# Upload data to FloydHub
To access data in a VM in FloydHub it must be transferred to the cloud first.
FloydHub provides commands via their CLI to upload large datasets from our machine to their cloud.
A zipped version of the train and test datasets is placed in the floydhub-zip folder.
cd floydhub-zip                # change into folder that contains the zipped data
floyd data init mnist.zipped   # create a new data resource on FloydHub
floyd data upload              # upload the data to that resource
You should now the following output in your terminal, which tells you that 14.7 MB of data are transferred to FloydHub.
It also gives you access to the DATA_ID after the upload has been finished.
Compressing data ...
Creating data source. Total upload size: 14.7MiB
Uploading compressed data ...
Done=============================] 15378159/15378159 - 00:00:00
Upload finished
DATA ID                 NAME                    VERSION
----------------------  --------------------  ---------
P3WVS2Vswo2o66pMsbPMTC  dotcs/mnist.zipped:1          1
In the summary table the DATA_ID is listed.
In my case is P3WVS2Vswo2o66pMsbPMTC but is different in your case.
Make sure to copy this ID as we'll need it in a second.
What we have transferred to FloydHub is a zipped copy of our data.
This is not exactly what we want to work with, so let's unzip it first on the remote machine.
We do so by switching to the floydhub-unzip folder.
Since unzipping is a one-time-step I suggest to create a new project for this task only.
This keeps the logs and version control of other projects that you have on FloydHub clean.
By running a shell command with the --data flag, we specify the data-container that should be mounted to the /input path of the container in which the shell command (or later the tensorflow environment) runs.
cd floydhub-unzip
floyd init mnist.unzipped
floyd run --data P3WVS2Vswo2o66pMsbPMTC "unzip /input/train-test.zip -d /output"
You should now see again some output that looks like this:
Creating project run. Total upload size: 282.0B
Syncing code ...
Done=============================] 1027/1027 - 00:00:00
RUN ID                  NAME                      VERSION
----------------------  ----------------------  ---------
b8yRAXUGMnhoTbrVvPMfCX  dotcs/mnist.unzipped:1          1


To view logs enter:
    floyd logs b8yRAXUGMnhoTbrVvPMfCX
This time our task runs asynchronously - again on a fresh VM.
At some point in the future the command will finish its work and the container will automatically be shut down by FloydHub.
To see what happens behind the scene it's possible to either check the dashboard or run the floyd logs <RUN_ID> command that was referenced in the output.
In my case the output is:
2017-06-11 06:25:12,073 INFO - Preparing to run TaskInstance <TaskInstance: dotcs/mnist.unzipped:1 (id: NQpRp4cU3srGWtMK33voLJ) (checksum: 9d9d607a8649c3ab0d9d69489f2d8fc4) (last update: 2017-06-11 06:25:12.065267) [queued]>
2017-06-11 06:25:12,085 INFO - Starting attempt 1 at 2017-06-11 06:25:12.077828
2017-06-11 06:25:12,322 INFO - Executing command in container: stdbuf -o0 sh command.sh
2017-06-11 06:25:12,322 INFO - Pulling Docker image: floydhub/tensorflow:1.1.0-py3
2017-06-11 06:25:13,506 INFO - Starting container...
2017-06-11 06:25:13,740 INFO -
################################################################################

2017-06-11 06:25:13,741 INFO - Run Output:
2017-06-11 06:25:13,792 INFO - Archive:  /input/train-test.zip
2017-06-11 06:25:15,027 INFO - inflating: /output/train.csv
2017-06-11 06:25:15,896 INFO - inflating: /output/test.csv
2017-06-11 06:25:15,942 INFO -
################################################################################

2017-06-11 06:25:15,943 INFO - Waiting for container to complete...
2017-06-11 06:25:16,287 INFO - [success] Finishing execution in 4 seconds for TaskInstance <TaskInstance: dotcs/mnist.unzipped:1 (id: NQpRp4cU3srGWtMK33voLJ) (checksum: 9d9d607a8649c3ab0d9d69489f2d8fc4) (last update: 2017-06-11 06:25:16.278860) [success]>
Here we see that two files have been written to the /output folder: train.csv and test.csv.
And again this data-container gets an ID assigned which can be used as the input container for another runtime container.
To get the ID of all containers there run the command floyd data status.
This gives us a list of all data-container, where the unzipped one has the DATA_ID NQpRp4cU3srGWtMK33voLJ in my case.
DATA ID                 CREATED        DISK USAGE    NAME                                                VERSION
----------------------  -------------  ------------  ------------------------------------------------  ---------
NQpRp4cU3srGWtMK33voLJ  2 minutes ago  121.97 MB     dotcs/mnist.unzipped:1/output                             1
P3WVS2Vswo2o66pMsbPMTC  5 minutes ago  14.66 MB      dotcs/mnist.zipped:1                                      1
Finally we do have transferred and extracted our data completely.
Since we don't need the zipped file anymore we can get rid of it: floyd data delete P3WVS2Vswo2o66pMsbPMTC.
Now it's time to move to the more interesting tasks. Let's get the CNN up and running.
# Run a Jupyter notebook
Multiple options exist how to run code at FloydHub using the CLI. Here I have written code as a Jupyter notebook which makes it necessary to run floyd with the flag --mode jupyter. To run a Jupyter notebook we first have to create another project which will be solely used for Jupyter. This spins up a fresh new VM for us. By using the --gpu flag we get access to an Nvidia Tesla K80 GPU with 12 GB of RAM. Can you already feel the power? ☺
cd notebooks
floyd init mnist-cnn-floydhub
floyd run --gpu --mode jupyter --env tensorflow --data NQpRp4cU3srGWtMK33voLJ
It might take a while to spin up the VM and the output should look like this. Note that in the first step around 21kB of data is uploaded to the VM. This is our Jupyter notebook, so we can access it directly in the upcoming VM. Because files that are uploaded in this step cannot exceed a given file size limit is is necessary to upload larger files with the floyd data CLI command as we have seen before.
Creating project run. Total upload size: 21.4KiB
Syncing code ...
Done=============================] 22993/22993 - 00:00:00
RUN ID                  NAME                          VERSION
----------------------  --------------------------  ---------
bViegecgc6cWncp9vmJRjG  dotcs/mnist-cnn-floydhub:1          1

Setting up your instance and waiting for Jupyter notebook to become available ......................

Path to jupyter notebook: https://www.floydhub.com:8000/XP3WqMBjV3meJejcmMhW66

To view logs enter:
    floyd logs bViegecgc6cWncp9vmJRjG
# Train the CNN
We have waited long enough to train our CNN, now we can do so.
Go to the URL provided in the command above, in my case https://www.floydhub.com:8000/XP3WqMBjV3meJejcmMhW66, and select the notebook floydhub-simple-cnn.
Select Cell > Run All to run the notebook and wait for the CNN to be trained.
After is has finished make sure to close the machine via the dashboard.
Jupyter notebooks run infinitely and are not shut down automatically so make sure to shut it down yourself when you're finished.
It should like this after shutdown:

While the notebook is executed several files are written to the /output directory of this VM.
After training the trained model is written to /output/model.ckpt.
Predictions on the Kaggle test dataset are written to /output/prediction.csv.
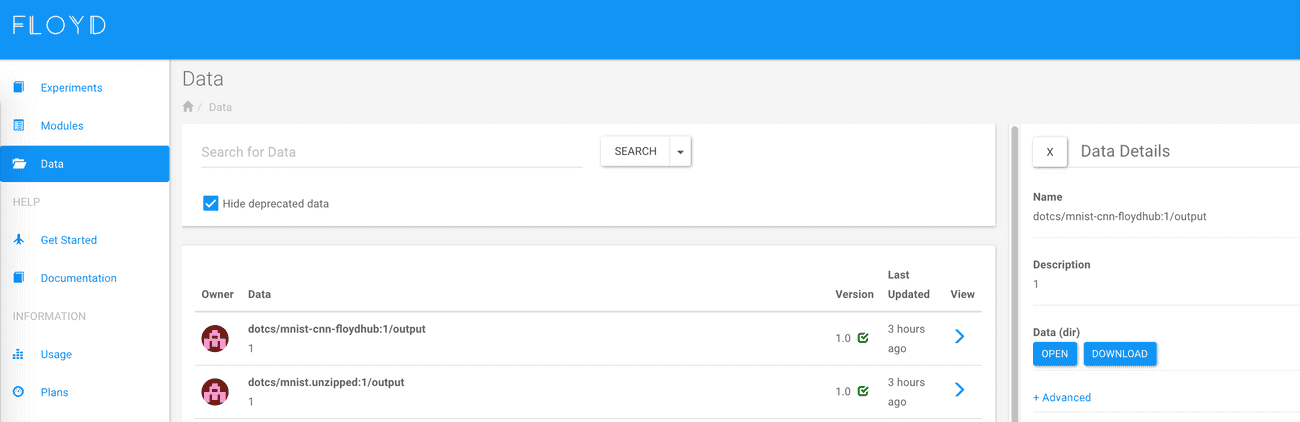
To download the data go to floydhub.com/data and click on the arrow in the View column.
This opens a detail view on the right which allows you to either browse the data (and download only parts of it) by clicking on the open button or download all the data as a tar-archive by clicking on the download button.
And by the way, predictions of this CNN yield an accuracy of 0.95071 on the Kaggle Leaderboard, which means that about 5 out of 100 images are classified wrongly. This is a not too good result actually, but also not too bad. Now it's up to you to use the power of this setup to yield a better result! Have fun!